Wednesday 29th April 2026
New starter battery purchased and installed, by Tyre Medics (just up the road; always spot-on service), on the drive. All electrical gremlins now chased out – I believe!
Wiring of a campervan is a big – and crucial – job. It’s mostly about getting power into the van’s habitation area, by means of solar generation or generation from the vehicle’s alternator, or from an external hook-up source. Or any combination of the above.
In the case of Zigzag Wanderer III, it’ll be all three.
However, a major job will be to, somehow, wrestle a bleddy great 465w solar panel onto the roof. Not something I relish, I’ll freely admit.
_
First, though, the small matter of reinstalling the cab headliner and associated gubbins. That way I can shirk installing the solar panel for just a little longer…
And it was one of those half-hour jobs that keep you on your toes for the whole afternoon. But aren’t they all?
Still, it’s all back in, together with the wiring to all the cab’s overhead switches (still don’t know if I’ll use them all, but at least the option is there now). One of them is wired to operate the cab ceiling rear LED lamp that came with the van (a BT install). Another may be deployed to operate the exterior lamp, which we have now, over the side door, although I’ll also probably add another switch near the door. As for the other two – I’ve no idea as yet.
While fitting the headliner, we stuffed all the cavities to each side of it with Diall recycled plastic bottle insulation. This stuff is pricey, but very safe and easy to work with – no gloves or mask needed, just tear it in one’s hands – so I feel it’s the right choice.
_
All the component parts of the overhead storage compartment are also now securely screwed together. I’m quite pleased with it all, and it’ll be very useful storage for bulky stuff like coats and Mandi’s broomstick when it can’t be hung on the door handle. There’s just the small matter of fabricating and fitting the cladding for the rear, habitation side, of it all.
_
I took the van for a very short round-the-block spin just to see how the mirror/Wolfbox stood up to real use, and whether its inherent looseness of connection to the windshield would be an issue. And guess what? On checking for the first time, just into the next street, it wasn’t working at all. Completely blank screen. It was working perfectly yesterday. What did I say about electrical gremlins?
On returning, I had a look for the originally-supplied fag lighter power supply so I could check whether the unit itself had failed – but somehow I’d completely mislaid it. Typical.
So, the next step was to delve into the connections at the fusebox. Multi-tester in hand, I pulled both piggybacks, replaced them, and checked both fuses for 12v, and both were fine, which didn’t bode well for the display screen. But then I glanced up, and it was now actually working! So I can only deduce user error, again. All I can think is that one of the 12v piggybacks hadn’t been pushed fully home and had worked loose. Salutary lesson there…
It’s all fine now.
Duh. Except it isn’t. I was working away in the back of the van, and suddenly noticed the display was ‘on’.
Funny, I thought. Not even a key in the ignition…
And it wouldn’t turn off, at all!
So, it’s now disconnected at the fuseboard, and I’ve connected it using the fag lighter power supply (which I eventually found when not looking for it, as is the way) and it appears to be behaving itself.
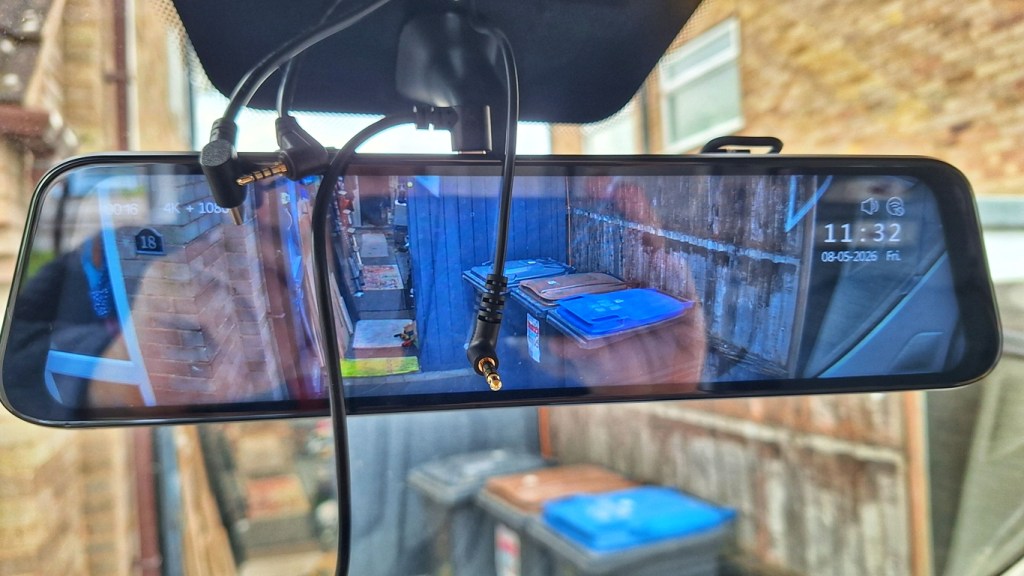
Power only connected here, so only front camera view available
I’m currently in correspondence with Wolfbox, which is going slowly as they keep coming back asking me to try something else, all of which I’d already tried. However, we appear to be reaching a conclusion now, and I await what will hopefully be a positive response and confirmation of a new unit to be supplied.
Here’s hoping, anyway.
_
Previous to all that, I fabricated the roof rafters from 12mm and 3mm ply laminated together. The extra thickness was required due to my having made the fan frame a little on the thick side, meaning it would protrude slightly below the roof panel. As it happens, it would be by 3mm, so the addition of 3mm ply to the rafters works out perfectly. Yes, I know I could have used 15mm ply, but I didn’t have any, but have plenty of 12mm and 3mm…
Next step, carpeting the door frames, and then the ceiling panels can be made and temporarily screwed in place (there’s some wiring to go above them, so they’ll have to come out to add that).

_
And the Wolfbox saga continues.
Just when I thought it was nearing satisfaction point, they, ‘Mark‘, came back with yet more questions, and things to try, and report back on, while he waits for their ‘technical team’ to get back with an answer…
As I’d tried everything he wanted to try already (and had intimated that previously), with no different result, I must confess to being somewhat short of patience by this point. However, I bit my tongue and duly reported back – trying to keep the edge out of the voice of my message.
I still await a resolution.
Eventually, they conceded that there is an issue, and sent a new hard-wiring kit, which I fully expected to iron out the issue.
It didn’t.
So, they sent out a new head unit, and it still isn’t right. I can only imagine that there’s some kind of incompatibility issue, although that seems far-fetched.
I give up.
Well, not totally. I dropped Mark a new mail to keep him in the loop, stating that I was going to pull it all out and bench test it with a battery, a direct feed, and a separate switched feed via the hard-wire kit, and would report my findings.
However, he came straight back with an offer of an OBD socket powered supply, which can, apparently, iron out some incompatibility issues. It’s free of charge, so of course I said yes please.
We’ll see what happens. Again…
It came, very quickly I might add. So I hooked it up, and, voila, it works. OK, there’s a caveat. It fires up with the ignition switch, but on turning off, it doesn’t shut down – immediately. Initially, I thought it was as useless as the normal hardwiring kit, so got back onto Wolfbox, who explained that it’s looking for a signal (how that’s generated I know not…) and when that’s received, it’ll shut down. And so it happened when I tried it again. A minute or so (maybe two) after switching off, the ‘mirror’ shuts down. Not absolutely ideal, but not much of an issue, so I can live with it.
Case closed. I hope.
_
A hiatus occurred. I had over a week ‘up on blocks’ as I felt utterly shoite, and could barely stand up without nearly passing out (a slight exaggeration, maybe, but I was so dizzy and fuzzy-headed there was no chance I was going to get on with the build until I felt somewhat better. I assume it was some kind of virus (M tells me there’s a lot of it about), but who knows? A week or so later and I still wasn’t right, although I was feeling much better.
_
Anyway… we eventually managed to carpet around the rear doors, and a timber strip was screwed above the doors at the requisite height to permit the 5mm ply rearmost ceiling panel to be screwed to it.
Making the panel itself proved to be a bit of a chore, as it had to fit nice and snug on the three sides, contoured around the steelwork, and cut out for the fan aperture. However, after a lot of faffing and trial and error (actually, no errors to speak of, fortunately) it was in place.
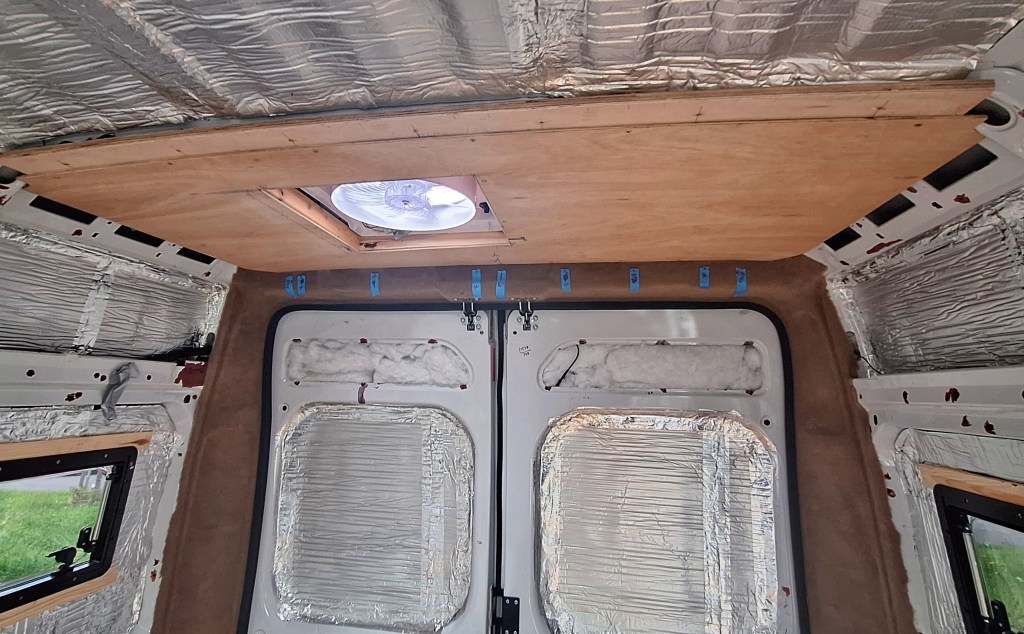
The second, slightly more straightforward, panel followed, with the third (and eventually fourth) to follow when more 5mm ply is obtained. The annoying thing about the ceiling panels is that, due to the width of the roof and the spacing of the steel roof beams, you need four full 2440mm x 1220mm sheets to complete it (when you’re talking of a ceiling that is approx 3m x (under) 2m, you end up with a hell of a lot of wastage.
Oh well, I’ll find a use for most of it, I think (even if I need to double it up in places).
_
The solar panel beckons. Oh f***.
The first job was to drill the panel surround in eight places to affix the mounting brackets, with one M6 bolt, washers, Loctite, and nuts, each. I’d bought stainless bolts and washers for the job, but somehow had omitted to order the nyloc nuts for them, grrr, so the supplied zinc-plated bracket fixings had to be deployed. Hence the Loctite, and hence daubing them all with lanolin grease after installing them. I’ll reassess later and decide whether it’s worthwhile swapping them out for stainless items later, but probably not.
Meanwhile, the bottoms of the alloy brackets were thoroughly abraded (Scotched) and knife-scratched ready for the application of Sikaflex 522 (with three thin tile spacers each to avoid excessive squishing-out of adhesive on tightening down the self-drilling screws into the – also pre-abraded – roof panel steel). These are stainless steel btw, and will also be covered with 522 to obviate any water ingress issues (not that there would be, but belt-and-braces, eh?).
And it came to pass that the next day dawned dry, bright, and warm (far too warm as it transpired – hottest day of the year so far, allegedly) so I dragged out the ladders, plonked them, carefully… against the side of the van, and went across the road to seek the help of neighbour Tom to hoick the damned thing, at last, onto the roof.
It turned out to be fairly easy for the two of us though.
Once in place, and with the mounting brackets settled neatly into channels (I was previously apprehensive that this wouldn’t be the case) I could step back, metaphorically; doing so on a ladder wouldn’t be the smartest move, check for the best position fore and aft, and Sharpie-mark the bracket positions.
These areas were then gently abraded with a fairly coarse Scotch pad (well, a cheap but decent Chinese alternative) after lifting the panel on timber blocks.
The very slight curvature of the roof from front to back meant that the front and rear brackets were slightly elevated due to the centre ones lifting them, so I decided to just use tile spacers on these and to bond the middle ones direct to the roof.
Working on one side at a time, Sikaflex 522 was fairly copiously applied, with spacers added and then the panel dropped back into position, squishing out most of the adhesive, but retaining a fair thickness on the spaced ones.
Bearing in mind that we were looking at 30 deg + Celsius temperatures and direct sun, the Sikaflex was going off rapidly so I quickly added the stainless M5 self-drilling screws so that I could clean up the excess.
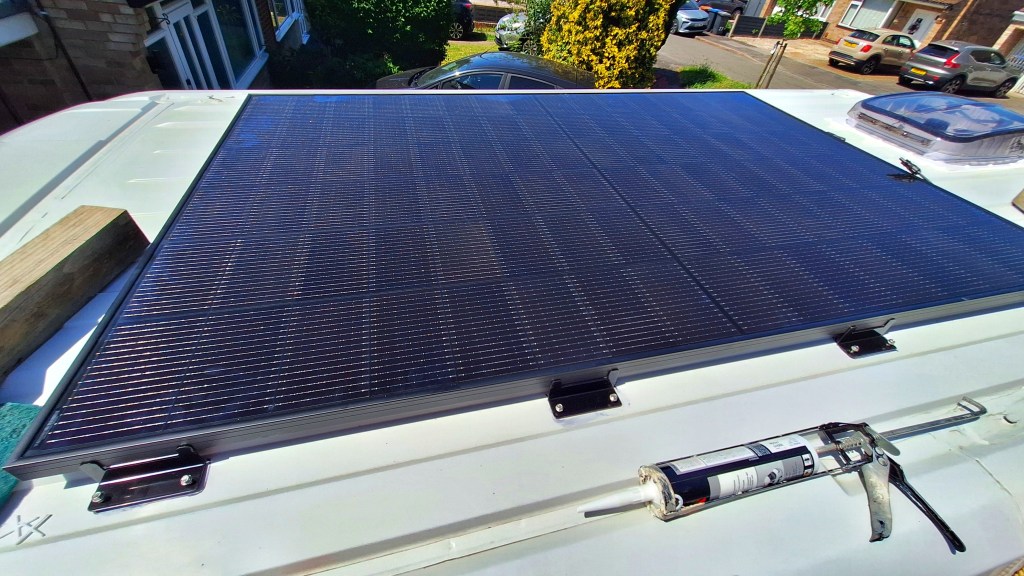
And it all looked pretty good.
There was just the small task of replicating it all on the other side, and it was finished – at last! (Well, apart from punching another hole through the roof for the cable entry gland).
_
That final step, together with adding the wifi antenna, is finally now done, but as I’m waiting for solar cable I can’t finish insulating and refitting the rearmost ceiling panel.
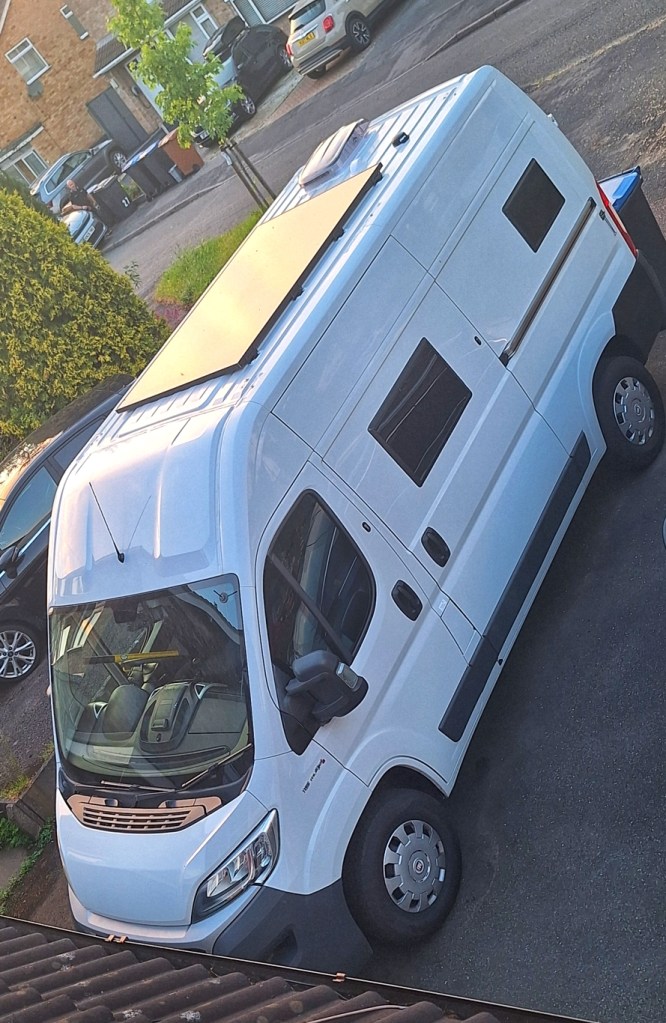
Starting to look more like a camper, at least on the outside
–
A big box of cables and associated gubbins arrived from Rotherham (Splitcharge.co uk; again, highly recommended) and it meant I could add the cables from the solar panels, poke them through the roof entry, and get everything properly sealed up.
–
With the ply obtained, and the remaining ceiling panels correctly sized and shaped, it meant that we could lay in the 1.5mm wires for the ceiling lamps, the over cab lamp, and the outside (above sliding door lamp strip/gutter), plus the switches for the ceiling and outside lamps. These will eventually be installed in the seating base near the door, but currently hang, taped to the C Post.
I also found a use for another of the cab overhead switches (two out of four now!), as one is now repurposed to switch an LED strip (recycled from the original BT setup, as is the cab rear overhead strip) concealed in the top of the over-cab storage area. Could be quite useful as it’ll be a pretty dark space when the final trim is fitted.
–
M ordered the ‘suede’ headliner fabric from Vandalised.co.uk. It has a 3mm foam/scrim backing, so it should look and feel pretty good. I don’t think either of us is particularly looking forward to installing it, but we really can’t put it off now. At least it’s four-way stretch, so that’ll help.
She also procured the grained vinyl trim for the three doors and the wall panels either side of the bed. Carpet would have been cheaper, but we figured vinyl will be more practical and hardwearing. The thought of rain soaking carpet on the open side door isn’t too pleasant. Vinyl can at least be quickly wiped down. The rear doors aren’t quite such a problem as they tend to be shut most of the time. They will be partially carpet-lined (mostly around the perimeter inside faces), with three inset vinyl-covered panels per door covering most of their area. It’s on us if we leave them open in the rain! I’m sure we won’t though, as the thought of a wet mattress, pillows, and duvet is less than pleasant. And I’ll waterproof them as far as possible, anyway, with a judicious application of Fabsil Gold (very effective stuff, and far superior to the standard Fabsil product – which is hopeless).
I think we’re gonna have quite a lot of the stretch carpet left over…
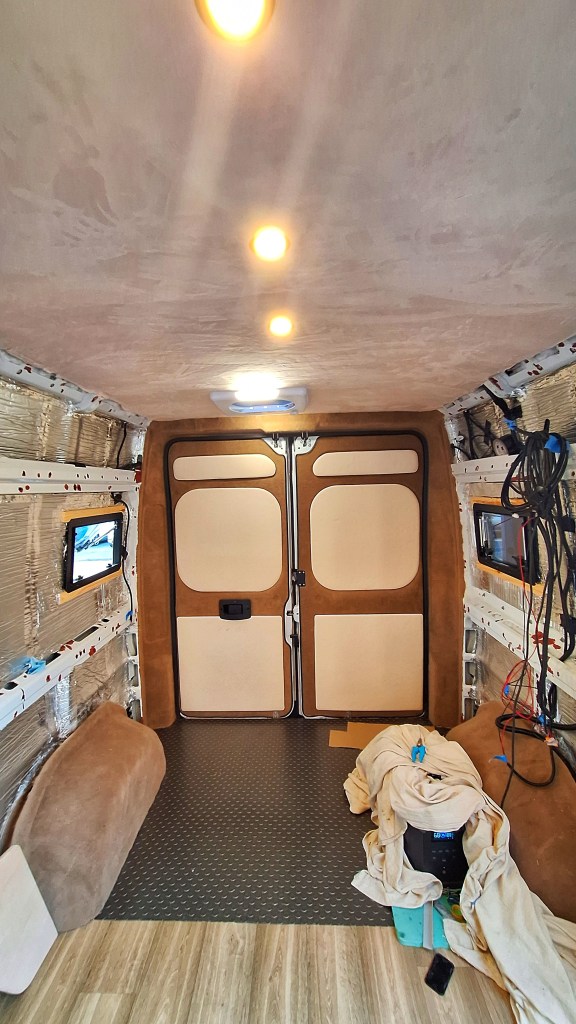
Having arrived, I eventually unpacked the ‘suede’ ceiling liner. Beige, we ordered, but there’s definitely a slightly pink hue to it. Can’t be bothered to send it back though, so install it we (mostly M to be fair) did. As expected, it was a bit of a pig to put up, but perseverance paid off and apart from one or two virtually unnoticeable wrinkles, it looks fine. If somewhat dusky pink. M described it a Thistle plaster-esque… oh well.
As I’d already laid in the wiring for the ceiling and cab lights and switches (and the fan), it could all be tested out using a powerbank – and it all checked out nicely. Tick!
–
The ‘house’ battery arrived from Fogstar.co.uk – and it’s a big ol’ lump (as expected), but way, way smaller and lighter than the equivalent lead acid alternative.
It has a capacity of 460ah (twice that of the one we installed in ZZW I). I did think long and hard about having the next size up, but I concluded that the extra cost, size and weight wasn’t worth it for our usage profile. Hopefully, combined with solar and dc inputs, it should be enough to run the induction hob. The 230ah one did ok, so I’m fairly confident. Belt and braces redundancy though, we’ll still carry a teeny-tiny camping stove/Jetboil and a few small gas canisters. Much quicker for making the odd cuppa, and saves a few watts. Thanks to Bruce Lauderdale at Powerhouseoffgrid.com for procuring it and the mounting base for us.
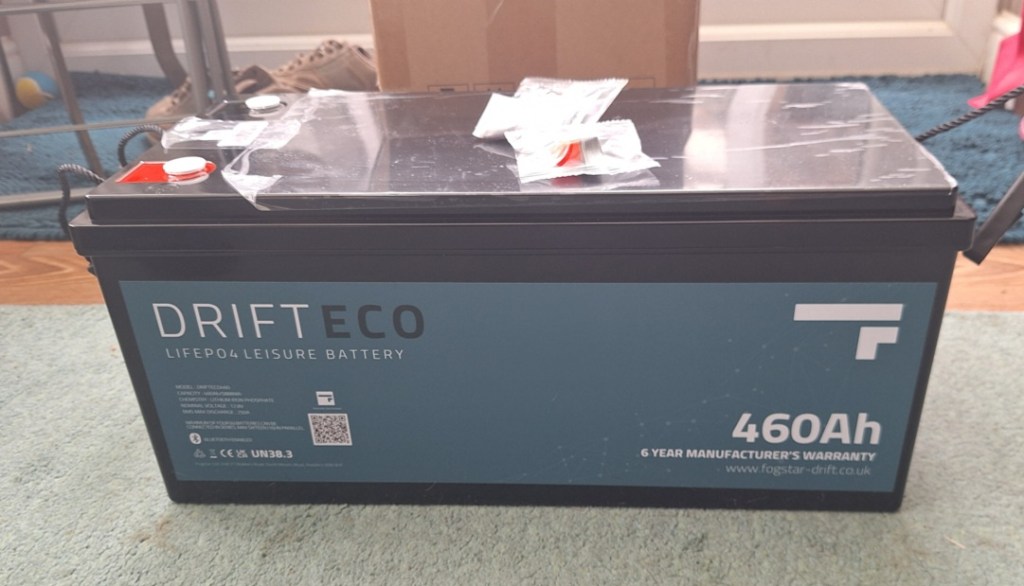
Brute
Some say (still!) that lithium isn’t worth the extra cost over AGM, but just compare the weights and sizes (and potentially lifespans) and it’s a (shit term alert) no-brainer nowadays. Even the initial cost is closer than ever before. The ‘eco’ version I bought is considerably cheaper than the full-spec version, yet retains bluetooth comms capability and the corresponding app, only missing out on the auto-heating feature of its more expensive sibling. However, we don’t plan any arctic-type offgrid trips, and It’ll be well insulated underneath, and the diesel heater will keep things warm enough to ensure it still charges reliably. Our Ecotree 230ah had heating pads, and they were never needed.
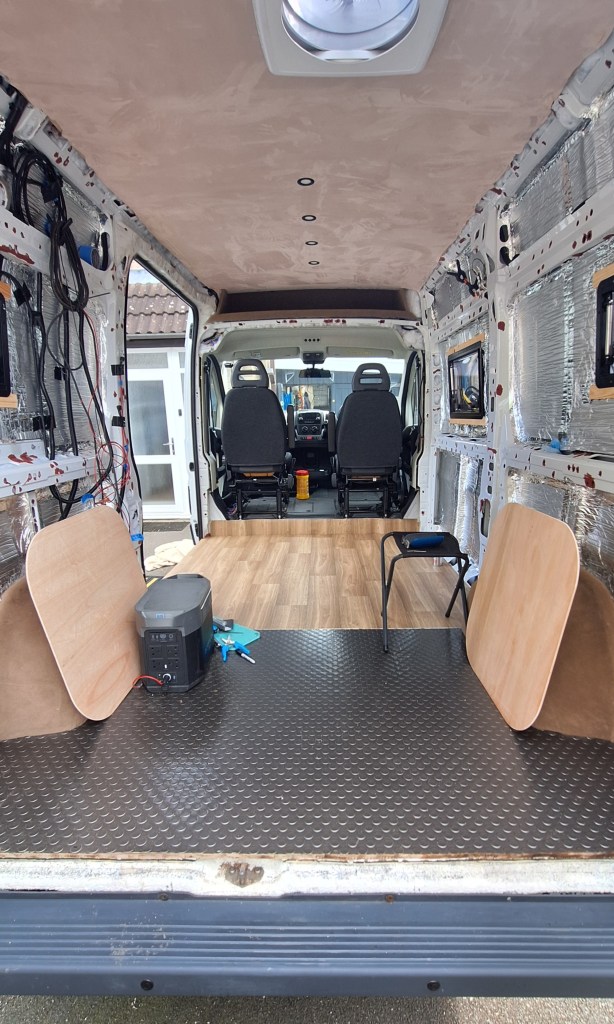
The installation can wait though. Before it goes in, I need to properly define the bed’s ‘footboard’ position, and lay the vinyl and ‘rubber’ (the latter in the garage area, although it’s not really rubber at all, sadly) floor coverings, and now we have both of those items, it’ll probably be the next stage.
–
The flooring is now in, and looks pretty good.
I still need to procure a couple of aluminium L-section threshold trims for the side and rear doors, and a similar item in a soft, flexible material for the rear edge of the cab floor to finish it all off, though.
–
Having done the floor, we went back to the rear doors.
We’d already insulated the cavities therein, and M had glued the perimeter u-section rubber on, and carpeted.
Next step was to start making the inset boards from ply.
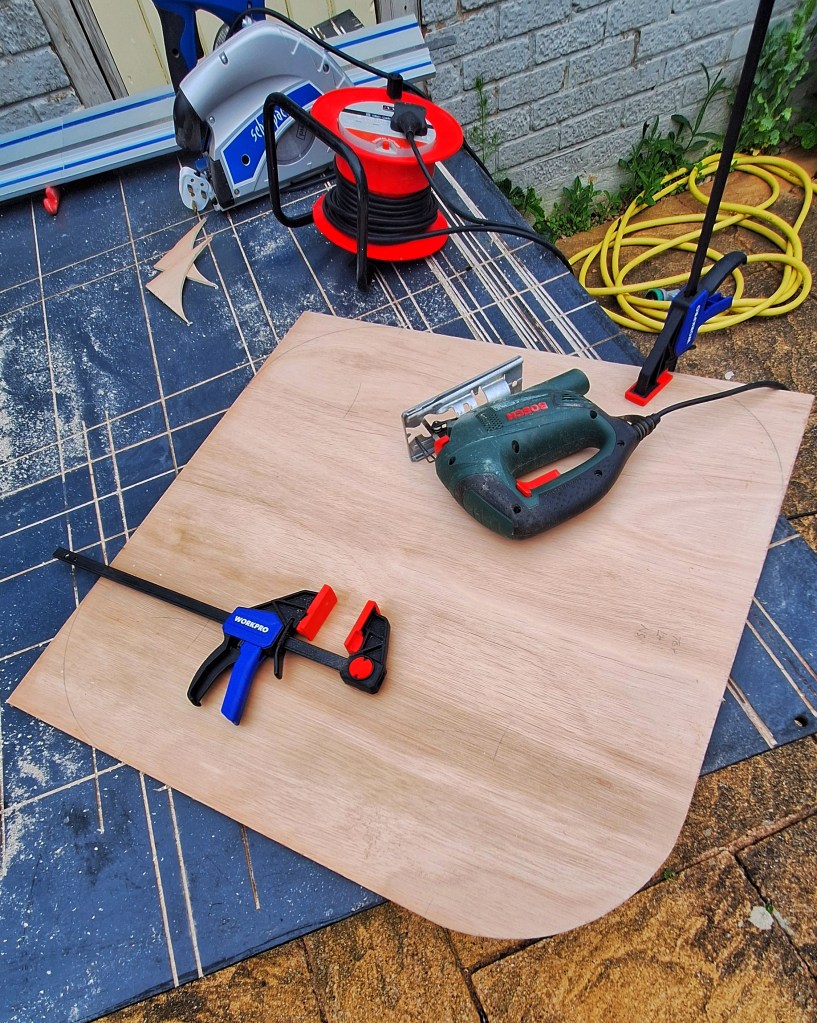
Door inset boards in ‘production’
I started with the middle ones (the ones that will effectively become the bed’s headboard) but on offering them up we found we’d over insulated the area. It would have been OK had we carried on with our original plan of using one-piece boards to cover each door in one go, but plans changed…
M did a fantastic job in the back yard, and in the late June heatwave, of covering the rear door insets with the ‘parchment’ coloured foam-backed grained vinyl. They look superb in place on the doors. We’re not happy with the way the top panels attach as they don’t sit very flush, but we have a plan for improving that before too long.
–
We decided to order a ply bulkhead-delete trim kit rather than fabricate one from scratch, which would have taken forever given its complex shape. It remains to be seen just how good/bad it is, and whether we just wasted our money.
It came.
To be honest – I think we wasted our money. It doesn’t fit well at all, certainly the side upright pieces, which I will remake in 5.5mm ply (the kit ones were 3mm – adequate if they’d fitted well, but as I need to remake, I’ll remake them slightly more substantially). The top piece, which is much more solid and a better shape, can go in pretty much unmodified – but – I think I’ll make a narrow (in height) ‘intermediate’ piece to sit below and behind it, which should help the uprights sit better.
I know exactly what I mean, but all that’s for the next blog.
In the meantime, I await the rest of the electrical components, which, ordered from Splitcharge via Bruce again (thanks again Bruce), should hopefully arrive corresponding to the much needed drop in temperatures next week so I can crack on without melting!

Leave a comment