Monday 23rd March 2026
Time to stop procrastinating, evading, hedging, fannying about, and making excuses.
Today we buy the stuff we really need to enable a start on the build proper. And about bleddy time if we’re going to have a workable campervan by the start of Summer. No, I don’t mean fully finished, necessarily, but in a condition whereby it could possibly be used for a few days away.
And, wouldn’t you know it? The insulation that I wanted was out of stock, even though it said it was in stock on the website. That’ll learn me.
At least I was able to pick up the sound-deadening panels at a reasonable cost. Back at home, M jumped on to Ebay again, and started hunting down closed-cell, foil-backed insulation, and ordered some for delivery around the 19th (it said. We’ll see).
Tuesday
Panel wiping! The sound-deadening pads are foil-backed butyl with an adhesive coat on the non-foil face. It’s a simple matter to peel off the paper backing and slap the pad onto the body panel requiring ‘de-ringing’ (for want of a better term – basically they help stop the panel resonation which makes it ring and add to the general cacophany associated with a big thin metal box driven over crappy road surfaces). So, the basic preparation is to get the pertinent area of steel (paint) degreased with alcohol, peel the protective paper, and slap the pad on. Well, it needs rollering also, to ensure the adhesive fully grabs, but that’s about it. General wisdom dictates something like a 30% to 50% coverage of each panel, although some people prefer a lot more. I’ll go with what the pro builders say though. However, my estimate was somewhat light. Looking at it (and rapping the panels) now there are a couple of areas where I think I could beneficially add a little more. Maybe a trip back to Treacle is in order to grab a handful of pads, or I may just use the butyl flashing that I happen to have on the workshop shelf…
Wednesday
A day of double-checking, sealing, and (temporarily) removing.
There are a couple of large-ish piercings in the load area floor panels where the diesel heater and drop vent were installed. As the new heater will be installed elsewhere, and the drop vent is unnecessary in an all-electric van, these needed to be plated and sealed with Sikaflex 522. Easy enough, and as they will be buried under the ply floor and insulation, they’ll never be seen. Eventually they’ll get a coat of Lanoguard externally when the rest of the van is done.
Next job was removing the cab headliner, and the plastic moulded tray above it. This was as fiddly as expected, not having done it before on one of these vans, and not knowing where all the fixings are, but it’s all quite logical and it all came out fairly easily with a bit of perseverance. While it’s out it gives access to the bank of four overhead switches, so these could be disconnected. I need to make a decision here as to whether I keep them in place or delete them. I’m just not sure if they’ll be of any use – maybe one of them for a cab lamp? There is already an LED lamp fixed to the rearmost edge of the headliner, so it would make sense to keep that and power it from the hab battery, so that’s probably a plan. Meanwhile, maybe I’ll just leave wiring in place leading from the switches to the rear of the cab so I have the option to use them for other purposes later – maybe exterior lighting over the sliding door for one thing?
Sunday
I opted not to use the aforementioned flashing as there wasn’t as much as I thought there was, so M ordered some more proper sound-deadening pads via Amazon, and these were due to arrive today.
However – ain’t Amazon great? They really excelled themselves this time. A parcel arrived while I was fiddling with the van, but I assumed it was something tiny that M had ordered that they had, in true Amazon fashion, packed in a very large box. Nothing unusual. Until, on opening said box, we found… nothing. Yep, it was a large, empty, box. Brilliant.
M swiftly got onto Amazon’s messaging system to report it, and they immediately offered a refund, which she accepted. However, it’s another delay. Ah well; more was ordered and delivery was slated for the next day. Fingers crossed.
Tuesday
The sound-deadening pads arrived, so I got on with adding to the body panels that I wasn’t happy with (quite a few), and this seems to have done the trick. I haven’t done the wheel housings yet, as this needs to wait until the floor is properly in (ply cut to size, insulated underneath, biscuited together, and laid).
Thursday
Out in the van! And M was driving.
We only drove as far as Harlow Timber, mind, just about a mile away, but it was her first time behind the wheel of this, or any other vehicle of this sort of size. Handled it like a pro, too, except reversing out of the yard. To be fair, there are only door mirrors to help at the moment, and I must admit it’s not easy to judge the length without a camera or beepers. Anyway, I jumped out as she thought she was about to run into a parked car. In truth there was about six feet left! I’ve bought a Wolfbox rear-view/dashcam ‘mirror’ now, like the one we had in ZZW II, so that’ll make a big difference. I also have a reverse beeper kit kicking around somewhere (unused from a previous project), so I may as well install that while the van is stripped out. Every little helps…
Anyway, we picked up the first batch of four sheets of ply in readiness for making the floor panels. Even plywood comes from China, it seems…
Monday
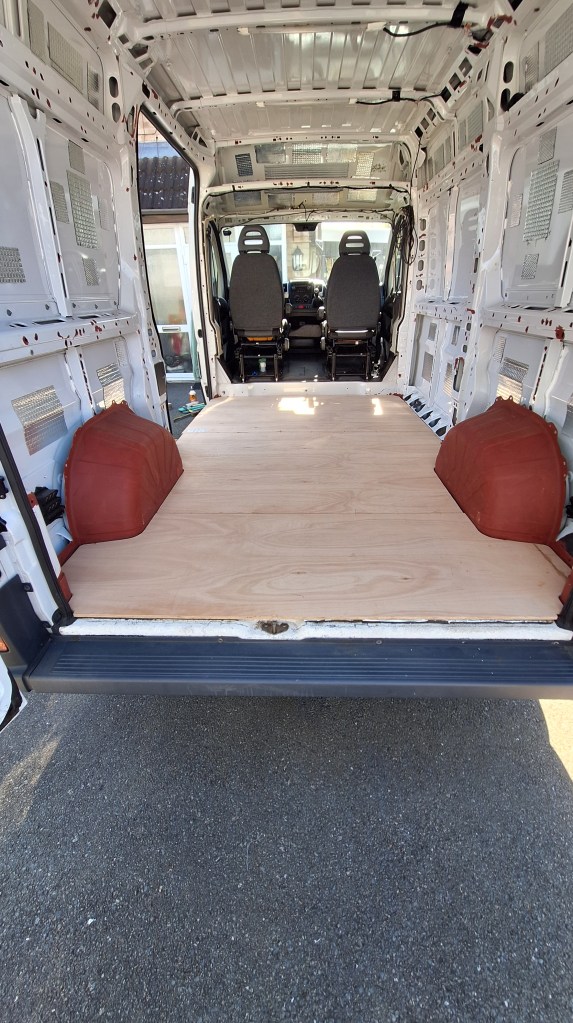
The typically English Spring weather seems to have intervened somewhat over the past few days – rain, cold, wind, yuk – so the flooring job was put on hold until today. Currently all cutting is being done outside and not under cover, so I’m having to pick my times for such jobs. Wind, plywood sheets, rain and power tools aren’t happy bedfellows.
After a lot of cutting, adjusting, and inning and outing, the floor was eventually ready, and was stacked under cover so that the insulation layer could be installed – self-adhesive, so fairly straightforward. Before throwing the floor panels in for the final time, all the joints were cut for the joining No.10 biscuits (marked-up for this before removing for the last time). We were rather nervous about tackling the final assembly, as I wasn’t sure how easy (hard) it would be to wrestle the individual sheets in, bearing in mind two of them straddle the wheel boxes, and the glued-in biscuits have to be aligned and the joins knocked together. In the event, though, it was all fairly straightforward, and we could finally celebrate a completed major stage. Hooray!
Tuesday
The floor is now finally in for good, so the next step was to start applying closed-cell insulation to the walls. This was a chance for M to take charge (thankfully) as this numpty is always likely to nause such jobs up totally. I detest wallpapering or anything like it (and this is probably worse as you only get one shot at application, as it’s pretty much stuck on contact) so I wasn’t about to refuse the offer!
I contented myself with tidying up the offcuts, and applying aluminium tape to the joins, also removing the soon-to-be-redundant body ribs from where the windows will go. Utterly vital jobs, y’see…
Wednesday
A little something turned up in the post this morning, and I could barely handle the excitement. It was, a handle. Now, it doesn’t sound like much, but if you know how crappy and tiny the OEM sliding door internal handle is on these vans, you’ll understand. They’re buggers to get a good swing at when trying to open or close the big, heavy, and generally not very wieldy side door, so the new one, which is almost twice as big, is a huge improvement.
it also has the bonus benefit of a built-in hook for M’s Travel Broomstick to hang on. Winner!
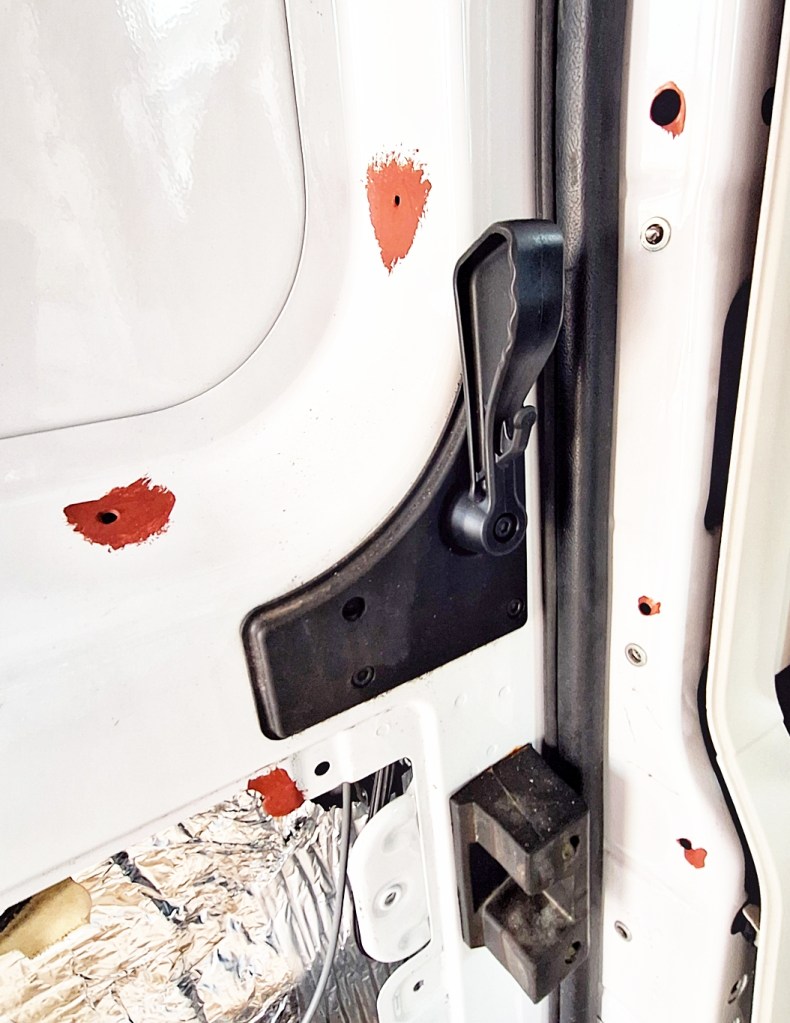
Two minutes to change too, and it’s a proper injection moulding, and not some dubious ‘printed’ effort. Highly recommended. Mohow supplied this.
Friday
Insulating the cab area (above the headliner) and habitation area ceiling. Again, M hung up her broomstick and offered to do this – so, no-brainer.
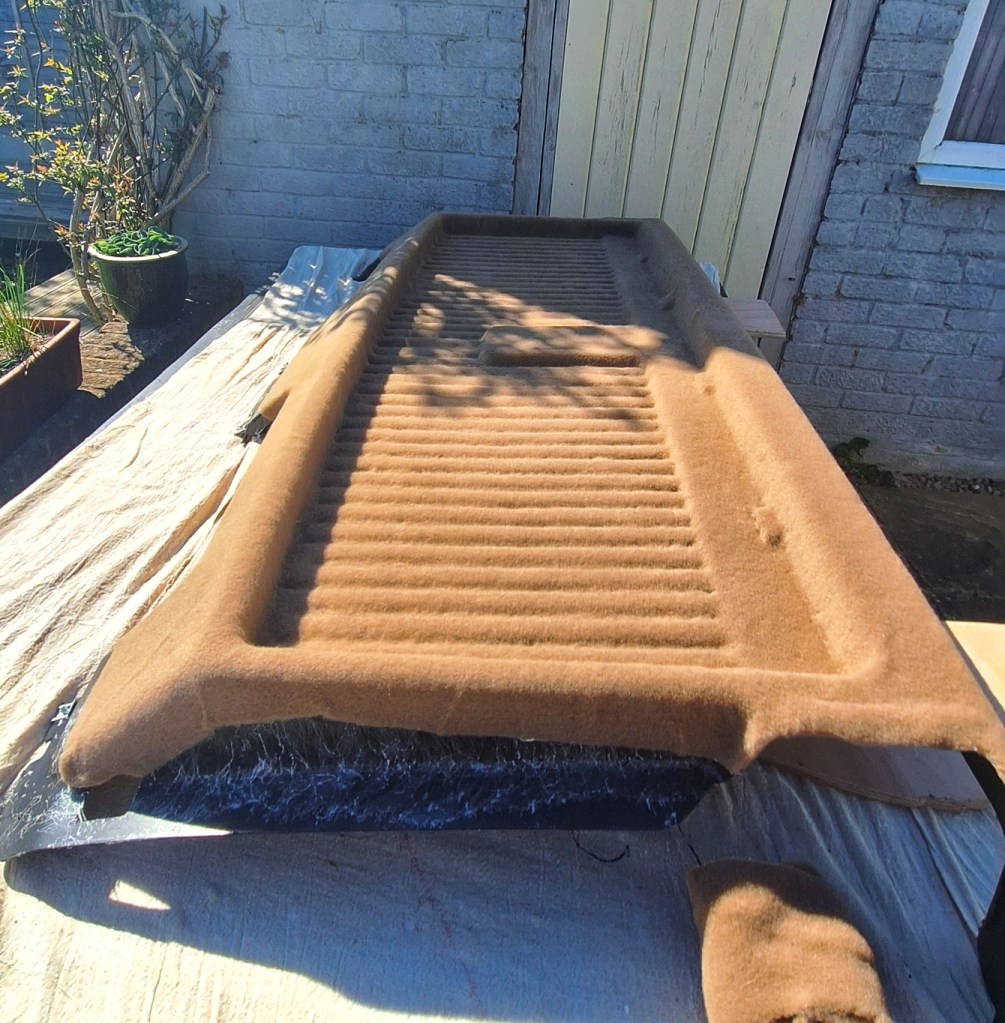
I spent several frustrating hours making templates for either side of the above-cab area, and cutting the pieces out from 12mm ply (a bit too thick really, but they’re not especially big or heavy, and that’s what I had hanging around. All I need to do now is carpet the base tray (big chunk of moulded plastic), the sides (and attach them to the tray), and the roof of the cab area. I just need to work out/remember how everything came out first, and mark up the cables from the overhead switches for potential future use.
Ordered a big bundle of 4-way stretch carpet and high-temperature glue too.
Monday
A quick run to Harlow Timber to pick up more ply and some 50×50 and 50×25mm planed all round.
Tuesday
The carpet and glue arrived, along with a decent crimp tool (have needed a good one forever) and some terminals ready for wiring up. Also four touch-switched, dimmable ceiling lamps in satin black, and a couple of matching gooseneck lamps with USBs turned up.
Running out of storage space!
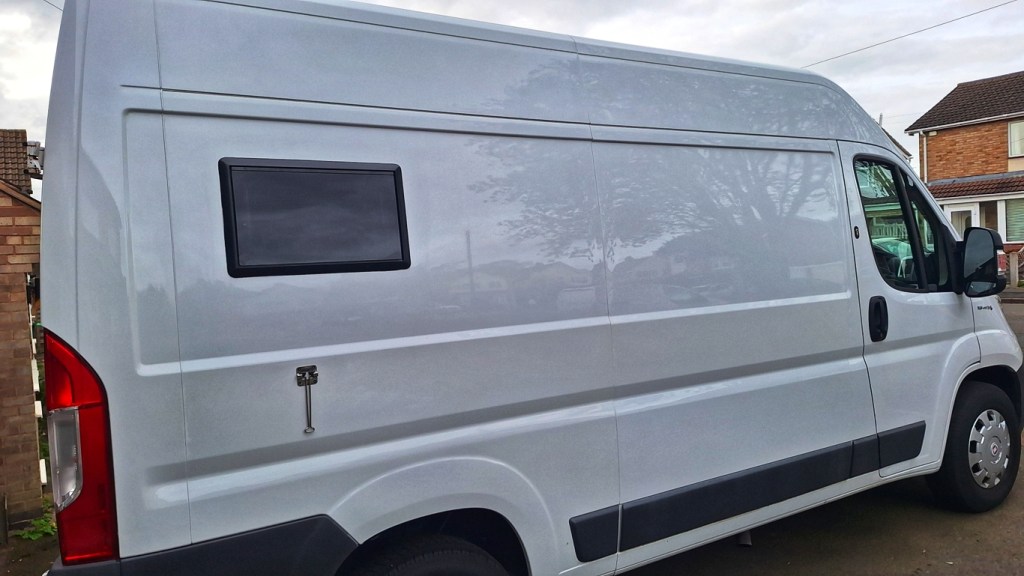
Big job started today too. The first of the windows went in. It was a little scary, cutting a hole in the van door, but you just have to be confident, measure
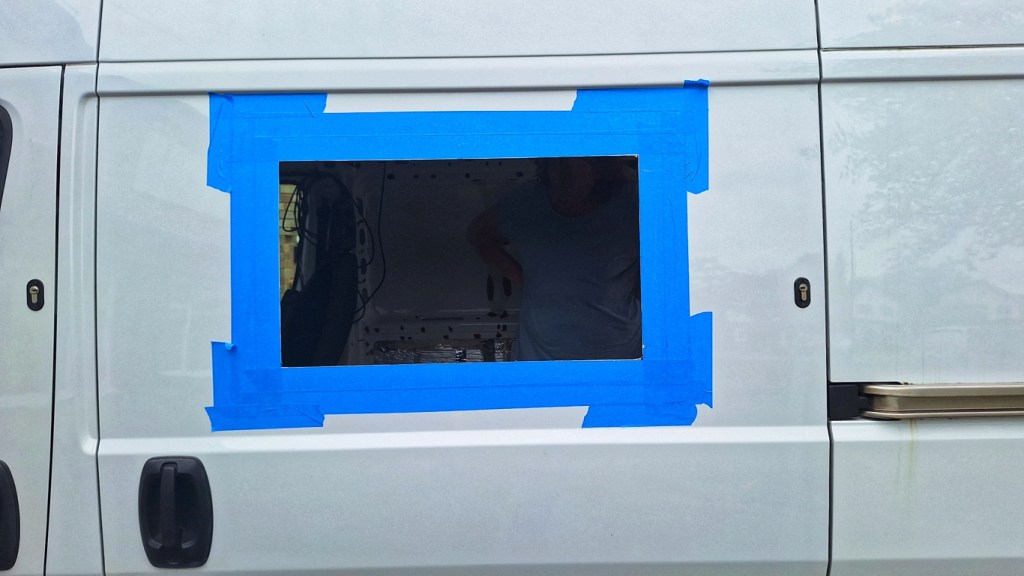
everything twice, and then a couple more times, and crack on!
It went well enough, and the window looks good.
Unfortunately the weather turned out to be not as good as forecast, so rain stopped play fairly early, meaning it was just that one window installed, but at least I managed to mark out for the smaller rear side one too.
Wednesday…
…turned out to be even worse, with far too much wet stuff, and even the first thunderstorm of the year. What a wash-out.
I did manage to make a start on installing the wiring for the rear camera, running it around and into the rear left door, and thence along the existing flexible conduit into the rear n/s body pillar. However, the rain came down hard once again, stopping play. I’ll try again mañana.
Thursday
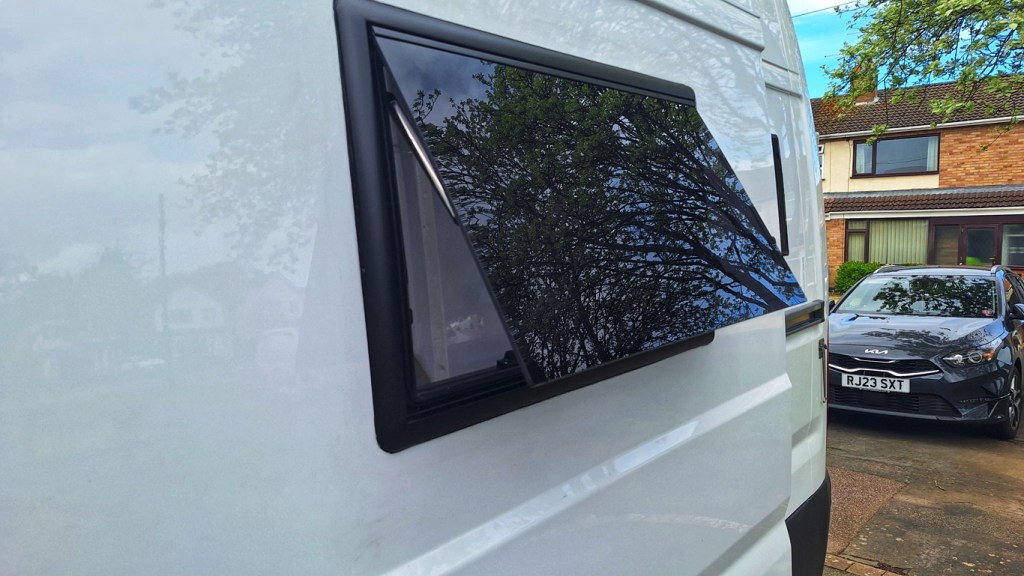
Weather promising, so we got on with the windows. Firstly, the nearside rear went in, followed by the offside rear. It’s starting to look a bit like a campervan…
Friday…
…and it looks even more like a campervan
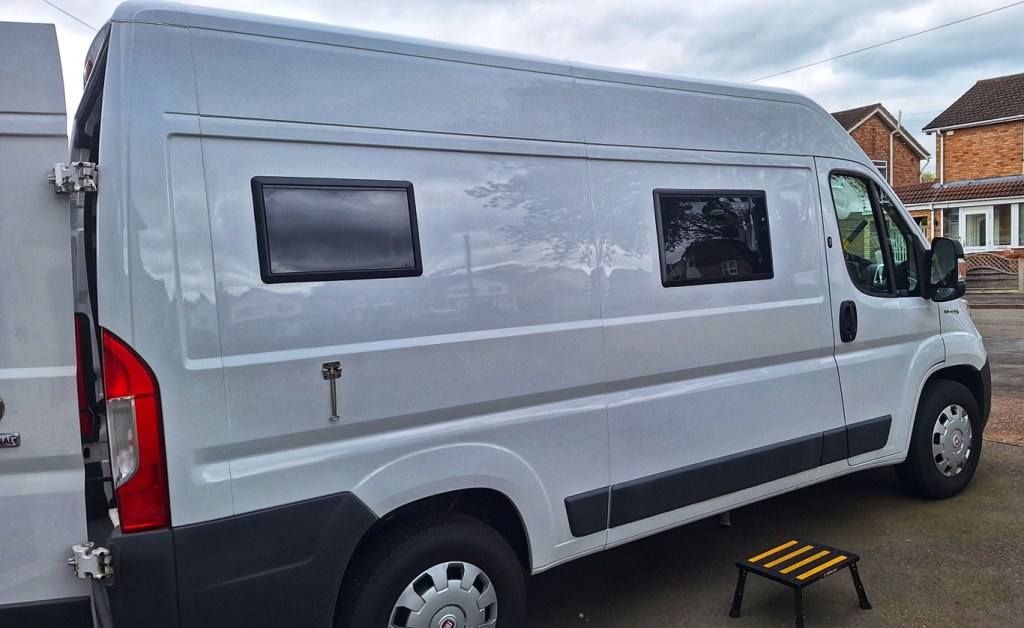
Two windows on the RHS

and two windows on the LHS.
Tuesday…
…and the next (final) big hole to cut in the body, is the 400mm square one in the roof for the Nomadic Ark Air Plus fan unit. To be fair, there are more holes to cut yet, for wifi antenna, shore power inlet, grey water outlet, solar cables, and diesel heater, but these are all far less scary.
of course, the weather didn’t cooperate any more than it needed to, although rain didn’t enter the equation – it just turned very, very gusty-windy, which is not a desirable state of affairs while stretching from the top of a ladder to jigsaw holes. It wasn’t dangerous; just very annoying and liable to cause mayhem while trying to manhandle a big old fan unit.
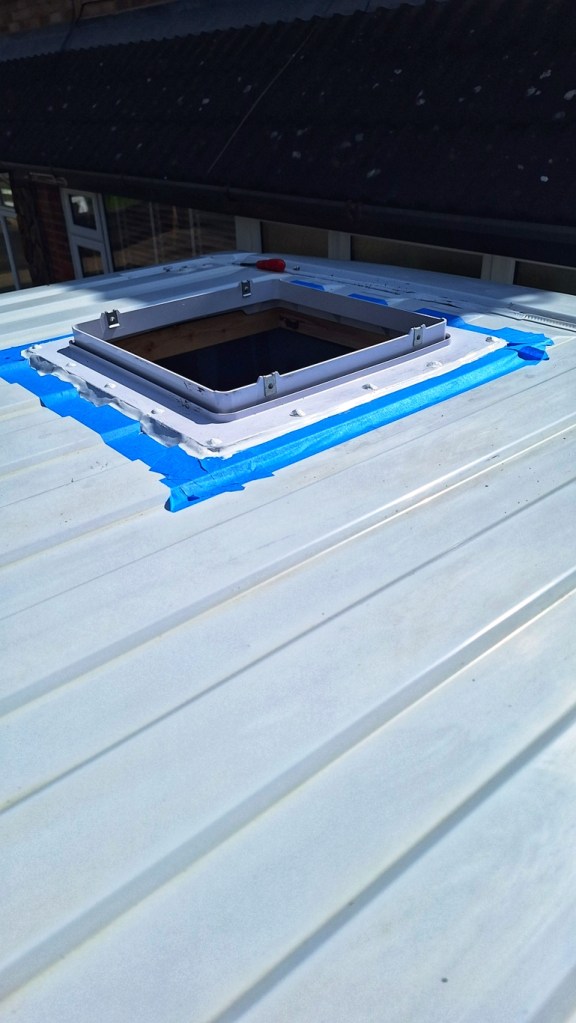
However, eventually it was in, secured, sealed (I hope) and temporarily wired up and thoroughly tested. And what a great bit of kit it is.
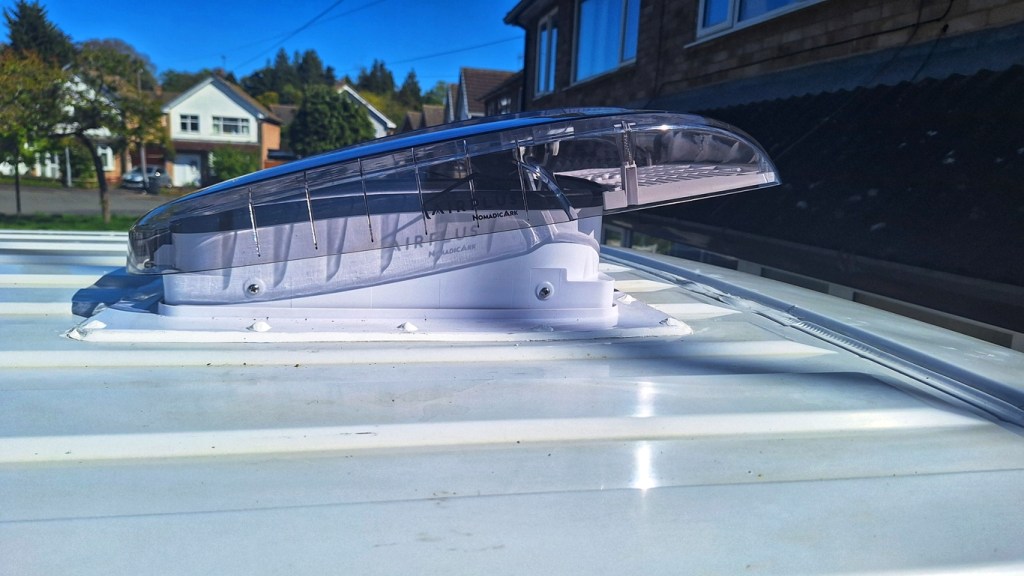
I’m struggling to think of a single thing the MaxxFan did better than this one.
Thursday
We decided to do a bit of carpeting. Specifically, we thought we’d have a go at covering the ugly, hard, shiny
over-cab storage tray, and the two side pieces that I’d made for it. It went pretty well, too.
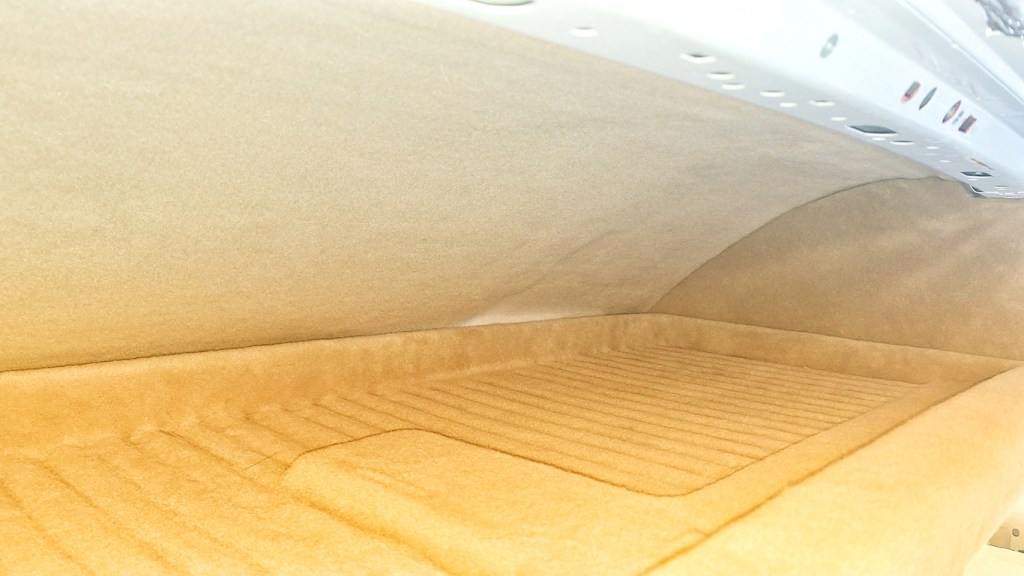
Carpeted tray, side panel, and roof area.
The headlining just needs installing below it, together with the associated visors, lamps, and associated wiring, and the cab end will be looking fairly complete (apart from the small matter of a swivel chair – possibly two – and the rear panel and side cladding, which will demand a lot of fabricating!).
Friday, Saturday, Sunday
I decided to drop on a couple of jobs I’d been putting off. Neither are crucial, as such, to the van build per se, but both will have an impact on its usability/driveability.
The first was to install the Wolfbox G840S rear-view ‘mirror’/dash cam, including fitting an actual rear-view mirror to hang it from. On reflection, I perhaps should have investigated their direct-to-screen bracket, but it worked well enough on the Alphard, so I thought I might as well replicate that. However, the Alphard’s mirror was far more solidly attached to the screen than this one (a bit wobbly) so I may have to re-think it after a road test.
I installed it using the optional hard-wiring kit direct into the dash fusebox, rather than stick with the supplied fag-lighter power supply. This gives two main advantages: one, it’s a far neater install, and two, it enables extra functionality, namely reversing guidelines, and ‘g-shock’ recording to the SD card in the case of an impact while parked. Maybe useful; maybe not…
It all took far longer than anticipated, mainly due to the completely fubar-ed status of the vehicle battery which discharged so deeply while doing the job that all sorts of weirdness occurred in the instruments and electrics in general. Utterly knackered, it is. A replacement is called for tout-suite.
The next incidental job was to supplement the reversing camera (which due to its high positioning on the back, and consequent limited view of the area close to the van) by installing a reversing aid ‘beeper’. As I think I said before, this is a kit I bought for ZZW I, but never used, and being such, the sensors were white, so I needed to carefully spray them in satin black. I think I got away with it, as they still seem to work. Very well, in fact.
On reflection, it might’ve been better to spray them grey, but I’m ok with it. I’ll just blacken the bumpers a bit!

Leave a comment